Getting new subversion branches after initial svn-git cloning

Earlier this week, I needed to work on a feature branch on the company’s subversion repository. (The one I did a git copy of a month ago).

Imagine my surprise when I couldn’t see the feature branch with git branch -r. The command shows all the branches and tags in a git repository. The branch was created after my initial cloning, and was not pulled down with subsequent git svn rebase.

It turned out to get subversion branches created after cloning, you need to do a fetch instead.

git svn fetch
git branch -r

Reading the git-svn man page more carefully, rebase only fetches revisions from the SVN parent of the current HEAD. In comparison, fetch fetches unfetched revisions from the tracked Subversion remote.

Checkstyle configuration

I spent yesterday configuration Jenkins for my current projects. Unless your team formatted their code to a high standard, checkstyle threw up a lot of noise about things that no team member would undertake to fix. Like excess white spaces, tabs, or Java docs for getters and setters. (Personally I loath tabs, but many editors put tabs in by default).

I couldn’t be the only one who wanted to run all checkstyle checks by default, except the ones I specifically exclude? I didn’t care that the checks included each installation of checkstyle might differ. I simply wanted to reduce the signal to noise ratio by removing the noisiest offender.

However, checkstyle configuration didn’t work on the principle of exclusion. If a configuration file was provided, then all the checks to be run must be specified in the configuration. I have tried fiddling with the suppression filter but could not get it to work this way either.

The only way to achieve this seemed to be adopting one of the checkstyle.xml templates one could find on the web. In the end, I used this one which claimed to be the Sun Coding Convention.

Creating a test user : Creating a local development database in MS SQL Part 2

When I was given my work laptop, it already had MS SQL server and the management studio installed. It was set up to use windows authentication. On the other hand, our populated test/development database used a SQL server authentication (ie with username/password). I needed to create a login for a test user on my local MS SQL server to achieve compatibility.

Create a test user login

First, in SQL server management studio, open a new query window by right clicking on the server name and select New Query. (This will create a query window for the master database). Create a login for user ${db.username} with ${db.password}.

USE master;
IF NOT EXISTS (SELECT * FROM master.dbo.syslogins WHERE loginname = N'${db.username}')
CREATE LOGIN [${db.username}] WITH PASSWORD = '${db.password}';

Then to add the new user to the test database ${db.name}.

USE [${db.name}];
CREATE USER [${db.username}] FOR LOGIN [${db.username}] WITH DEFAULT_SCHEMA=[dbo];
ALTER ROLE [db_owner] ADD MEMBER [${db.username}];
ALTER ROLE [db_datareader] ADD MEMBER [${db.username}];
ALTER ROLE [db_datawriter] ADD MEMBER [${db.username}];
Mixed authentication

My SQL server was originally set to only allow windows authentication. I needed the SQL server instance to accept mixed authentication instead. (Mixed authentication allows both windows and sql server style authentications). In SQL server management studio, right click on the server name, then choose Properties. On the Security page, under Server authentication, select SQL Server and Windows Authentication mode.

You need to restart the SQL server instance to activate this feature. You can restart the server by right clicking on the server name again, and choose Restart. However, you might want to activate TCP/IP authentication before restarting.

Enable TCP/IP Protocol

Lastly, open the SQL server configuration manager (via the windows start menu). Under SQL Server Network Configuration -> Protocols for MSSQLSERVER, toggle the status for TCP/IP to Enabled. You can restart the server now by going to SQL Server Services (in the left navigation pane), right click on SQL Server (MSSQLSERVER) and choose Restart.

Copying an existing database : Creating a local development database in MS SQL Part 1

One of the first tasks I set myself at my new role was to create my own local development database. Currently, the developers were developing against a populated database shared amongst developers and testers.

I couldn’t find the scripts to recreate the database schema from scratch. The Copy Database Wizard in MS SQL Server Management Studio (SMS) failed with authentication problems. Backup Database stored the sqldump on the remote server hard disk which I didn’t have access to. I was ready to give up when a colleague from another team told me about the scripting functionality in SMS.

Database Objects Scripts

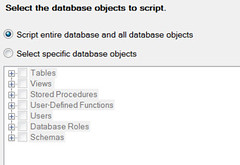
In SMS, right click on the database you want to replicate, then select Tasks -> Generate Scripts. A dialogue will pop up, where you can select the database objects you want to copy. You can copy specific tables, views, stored procedures etc, as shown in the following diagram.

Then in the next dialogue, under the advanced options, there are two options I found especially useful.

  • Script DROP and CREATE
  • Types of data to script: options are schema only, data only and both schema and data

Once the script was generated, it can be applied in a query window for the target database.

Mule Studio and Maven Profiles

The maven project I’m working on has profiles for different environments, such as testing, development and deployment.

<profiles>
	<profile>
		<id>test</id>
		<activation>
			<activeByDefault>true</activeByDefault>
		</activation>
		<properties>
			<db.host>testdb.mycompany.com</db.host>
			<db.name>projectx</db.name>
		</properties>
	</profile>

	<profile>
		<id>development</id>
		<properties>
			<db.host>127.0.0.1</db.host>
		</properties>
	</profile>
</profiles>

To activate multiple profiles at run time, you use the command line option -P
mvn test -P test,development

Or inside eclipse with m2e, you can configure a list of active profiles under Run Configurations.

However, with Mule Studio, if you run the project as a Mule Application with Maven, there are no options to select maven profiles.

The way to get around this is to edit the maven profiles to be activated by a property or a file. In my case, I updated my pom.xml to

<profiles>
	<profile>
		<id>Test</id>
		<activation>
			<activeByDefault>true</activeByDefault>
			<property>
				<name>env</name>
				<value>test</value>
			</property>
		</activation>
		<properties>
			<db.host>testdb.mycompany.com</db.host>
			<db.name>projectx</db.name>
		</properties>
	</profile>

	<profile>
		<id>Development</id>
		<activation>
			<file>
				<exists>.git</exists>
			</file>
		</activation>
		<properties>
			<db.host>127.0.0.1</db.host>
		</properties>
	</profile>
</profiles>

The test profile is activated by setting the system property env to test. This is done in Mule Studio under Windows -> Preferences -> Mule Studio -> Maven Settings. In the “MAVEN_OPTS environment variable” text box, add -Denv=test. The development profile is activated by the existence of a .git file in the project root. Now when I run this as a mule+maven project in eclipse, the properties from both of these profiles are available.

You might ask wouldn’t it be easier to just add -P test,development to the MAVEN_OPTS text box? Yes it would definitely be, but mule studio complained about -P being an unrecognized option.

PS. I’m using mule studio 3.5.

Logging configuration in Jboss AS 7.1.1

My new work used Jboss Application Server 7.1 for its web applications. One of the things that surprised me was that it was not straightforward to configure webapps to use log4j.properties for logging configuration.

For development, I like to set all logging to ERROR level, except for the packages I’m working on. To achieve this in Jboss, edit the logging subsystem section in the file ${JBOSS_HOME}/standalone/configuration/standalone.xml.

<subsystem xmlns="urn:jboss:domain:logging:1.1">
   <logger category="com.mycompany.project.package">
     <level name="DEBUG"/>
   </logger>
   <root-logger>
     <level name="ERROR"/>
     <handlers>
       <handler name="CONSOLE"/>
       <handler name="FILE"/>
     </handlers>
   </root-logger>
</subsystem>

This will be applied to all webapps deployed in the Jboss instance.

Using git with a large subversion repos

I recently found myself working on a very large subversion (svn) repository. The repository (possibly) contains the company’s entire code base, spanning nearly 90,000 revisions. Even within the module I’m working on, there are over 300 branches.

Being a git convert, the first thought that occurred to me was to try git-svn, instead of moving back to svn. I love the ability to create multiple local feature branches. (I also prefer the way git merging works. But git-svn is restricted to the svn merge model).

For projects with many branches, it is recommended you clone one directory only. Otherwise, the resulting git repository will be many times larger than the original trunk.

git svn clone http://svn.mycompany.com/projectx/iteration123
Partial Cloning

However, I wanted to clone the trunk and a selection of branches. There are the options –trunk, –tags, –branches for svn repositories with non-standard layouts. Git-svn will also skip checking out paths specified with the option –ignore-paths.

After some experimentation, I found it easier to create an empty git repository, manually edit .git/config, and then fetch. Instead of using the command line options to clone.

git svn init http://svn.mycompany.com/projectx

Edit .git/config

[svn-remote "svn"]
url = http://svn.mycompany.com/projectx
fetch = trunk:refs/remotes/trunk
branches = branches/{iteration123}:refs/remotes/branches/*

The branches entry must contain a wildcard, or git-svn will complain with an error message along the lines of ‘glob needed’. I used the curly braces to fetch the branch iteration123 only. Multiple branches can be specified comma separated, like {iteration123,iteration124}.

I also restricted the fetch to recent revisions, by using the -r option

git svn fetch -r 80000:HEAD

Workflow

After the initial cloning hurdle, I found git-svn very straightforward to use.

At the start of each day, I merged changes from svn by using

git svn rebase

I committed changes to my local git repository with

git commit (-a)

Git-svn pushes each local commit as a separate commit to the remote svn. However, I committed very often and I really didn’t fancy polluting the svn log with lots of ‘reverting’, ‘trying x approach’. Therefore, I squashed all my commits for a scrum task into one commit before pushing the changes back to svn trunk.

git rebase -i branches/iteration123
git svn dcommit